
Design has traditionally required multiple roles working in sequence: strategist to describe the problemdesigner to prepare the solutionand engineers to build it. This means coordinating timelines, aligning ideas, and going through rounds of iteration before anything tangible is created.
Claude Design removes much of this conflict by turning ideas into practical results. What once took weeks can now happen in minutes. In this article, we break down how Claude’s design works and walk through real examples from idea to final prototype.
What is Claude Design?
Claude Design allows the Anthropic system to produce real visual and functional results, not just descriptions. Many AI tools act as advisors, giving suggestions. Claude is really constructive. It can generate animated presentation submissions, export UI designs to Canva, and create full React apps with authentication and payments.
The main difference is how he thinks: Claude approaches design like a senior designer, checking many aspects in one pass. Its capabilities are organized across three key layers:
- Visual design: The program creates design elements that include structural components and color schemes as well as type design and space distribution and component design features.
- Content design: The program creates narrative structure that includes copywriting and information flow design.
- Functional design: The system uses functional code to create interactive prototypes that connect to back-end systems.
Many tools only exist in one operating layer. Claude works simultaneously in all three layers of operation.
How does this work?
The process is straightforward, and the following steps will help you understand how things work.
- Start by explaining the concept in simple language. Even a short sentence works, although more context helps. Claude can take little input and produce something useful.
- It will then ask a few quick clarifying questions about audience, tone, format, and limitations. This takes a few minutes but saves hours of back and forth later.
- Next, Claude made a rough plan before building anything. It thinks about the structure first, so that the output is not random or scattered.
- From there, it produces the full output at once. That could mean writing content, designing architecture, or building a working prototype.
- You can repeat as needed. Just provide feedback in plain language and it will adjust to all output, including product changes.
- Finally, the work is exported in whatever format you need, whether that’s a presentation, code, design file, or something interactive.
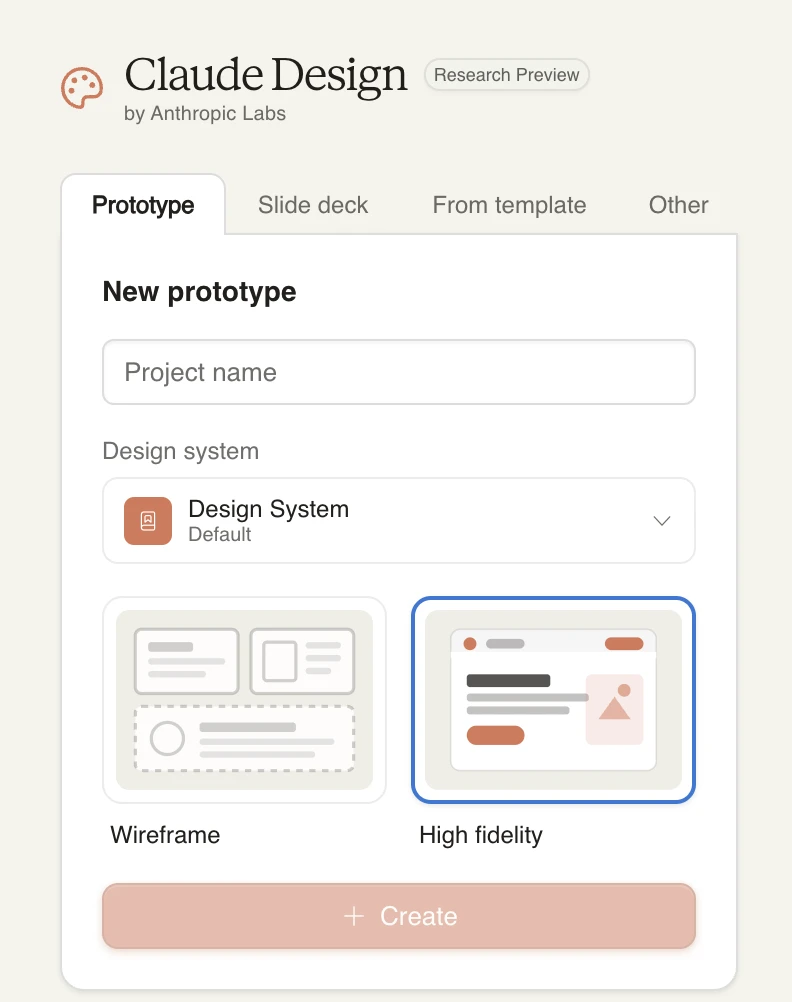
Starting with Claude design
The user can access the cloud design through the following steps:
- Visit to access the platform, the models are the same as cloud chat, with a different interface.
- After that, you can choose whether you want to create a Prototype, slide deck, animation design using the existing template design.
- Once selected, give your project a name and choose a default design and you can start with your command.
Hands On 1: “Explain Our Product” → Branded Animation Deck
This is not a strict step-by-step process. A continuous flow, from defining the goal, shaping the output, motivating Claude, to the final result.
The sections below break down the key pieces so you know what to look for.
1. Define the purpose
He created a Cowork tutorial that explains how the plugins work within an automated business workflow setup.
2. Find a gap
The existing documentation is very complex, and teams don’t clearly understand what plugins are or how they differ from MCP connectors and Skills.
3. Design the output
A 25-minute Tutorial Deck that explains concepts, usage, market access, permissions, and security.
4. Produce with Claude
Inform Claude to create a ~15 slide deck in dark mode, developer style, with speaker notes.
5. Refine the structure
Make sure the deck includes important sections such as classics, market guidelines, installation flow, life cycle, and sandbox security.
6. Polish consensus
Check the layout, spacing, monospace font, and overall clarity of all slides.
7. Enter the brand name
Match the deck to existing product styles (colors, fonts, logos) using previous examples.
View the full workflow
The video below walks through this entire process in one continuous flow: from shop to shop prepared.
Final output
The following video shows the completed prototype and what the final result looks like.
Hands On 2: App View → Prototype Layout → Live in Canvas
This is not a strict sequence of steps. It’s a guided build—it goes from idea → structure → design → refinement, with Claude helping at each stage.
The description below gives you a clear mental model before you watch it in action.
1. Define the concept
An app for Gen Z users to document emotions and mental health using mood tracking, voice input, and AI-generated weekly summaries.
2. Find an audience
Young adults (around age 22) who want to manage their mental health but have not found existing treatment apps helpful.
3. Set a goal
Create a complete, editable prototype that can be exported and refined with tools like Canva.
4. Produce the first prototype
Instruct Claude to create the main screens: boarding, home, journal entry, mood entry, and weekly summary.
5. Map the user experience
Describe how users think and feel throughout the stage—initial onboarding versus return usage.
6. Create main screens
Create ~6 key screens with clear layout, spacing, and design.
7. Add performance information
Include things like mood tracking (emotional sounds), voice recording, and written thinking.
8. Document design decisions
Create a log that explains your choice of layout, typography, color, and overall usability.
9. Prepare to export
Layout screens for easy export as editable frames in Canva.
View the full workflow
The video below shows the whole process in one building in progress: from idea to working prototype.
Finally
The following video shows the completed prototype and what the final result looks like.
Advantages and Disadvantages of Claude Design
With all these tools have to offer, here is a table summarizing their strengths and weaknesses:
| Benefits | Evil |
| Design speed – Go from idea to prototype in hours instead of days back and forth. | It requires human judgment – Original texts can miss the context; A final designer review is still required. |
| Thinking against discipline – Manages visual, content, and functional design together instead of in silos. | Limited creative experience – Strong in structure, weak in unique product experience or creative sense. |
| No expert is needed to get started – Anyone can create a solid first version that designers can modify later. | Repetition is still necessary – Complex interactions and edge cases often require multiple refinement cycles. |
| Product consistency at scale – You learn product assets once and use them throughout the project. | The code is not ready for production – Generated code may need to be optimized before real world deployment. |
| Reduced friction in editing – Change happens quickly with simple commands instead of long feedback loops. | Approximation of scale content – Can lose track of previous decisions on large, complex projects. |
| It handles complexity without manual handouts – Can create full stack flow and multiple screen programs at once. | No user authentication – It does not check whether the product meets the actual needs of the users. |
The conclusion
Designers, engineers, and strategists were replaced by Claude Design. It eliminates the slow parts: from scratch, building the first wireframes, and waiting days for mockups. Conventional barriers disappear, allowing teams to move from idea to tangible output much faster.
What’s left is the really important work: deciding if the product solves a real problem, if the product feels authentic, and if the experience resonates emotionally. Claude helps you test and show ideas early, so instead of pitching ideas, you go into meetings with practical examples.
Frequently Asked Questions
A. Claude Design creates full design results (UI, content, and code) in consultation with finished projects instead of just providing suggestions.
A. No. Claude expedites design and prototyping, but human judgment is still required for design, validation, and final production decisions.
A. You can create presentations, UI prototypes, React apps, and Canva designs with a simple idea with iterative feedback.
![]()
Data Science Trainee at Analytics Vidhya
I currently work as a Data Science Trainer at Analytics Vidhya, where I focus on building data-driven solutions and applying AI/ML techniques to solve real-world business problems. My work allows me to explore advanced analytics, machine learning, and AI applications that empower organizations to make smarter, evidence-based decisions.
With a strong foundation in computer science, software development, and data analysis, I am passionate about using AI to create impactful, innovative solutions that bridge the gap between technology and business.
📩 You can also contact me at [email protected]
Sign in to continue reading and enjoy content curated by experts.